🐂 🌾 Oxen#
Oxen makes versioning your datasets as easy as versioning your code.
# The first step for creating any dataset should be `oxen init`

oxen init
oxen add images/
oxen commit -m "Adding my data"
oxen config --set-remote origin https://hub.oxen.ai/ox/CatDogBoundingBox
oxen push origin main
Clone your data faster than ever before.
# The first step in collaborating on a dataset should be `oxen clone`

oxen clone https://hub.oxen.ai/ox/CatDogBoundingBox
✅ Features#
Oxen was optimized to be fast on structured and unstructured data types. Unlike traditional version control systems that are optimized for text files and code, Oxen was built from the ground up to be fast on images, video, audio, text, and more.
🔥 Fast (10-100x faster than existing tools)
🧠 Easy to learn (same commands as git)
🗄️ Index lots of files (millions of images? no problem)
🎥 Handles large files (images, videos, audio, text, parquet, arrow, json, models, etc)
📊 Native DataFrame processing (oxen df command for data exploration)
📈 Tracks changes over time (never worry about losing the state of your data)
🤝 Collaborate with your team (sync to an oxen-server)
👀 Better data visualization on OxenHub
Why the name Oxen?#
“Oxen” 🐂 comes from the fact that the tooling will plow, maintain, and version your data like a good farmer tends to their fields 🌾. Let Oxen take care of the grunt work of your infrastructure so you can focus on the higher-level ML problems that matter to your product.
Overview#
No need to learn a new paradigm.
The Oxen Command Line Interface (CLI) mirrors git in many ways, so if you are comfortable versioning code with git, it will be straightforward to version your datasets with Oxen.
Watch as we commit hundreds of thousands of images to an Oxen repository in a matter of seconds 🚀

🐂 CLI Installation#
For Mac Users
brew tap Oxen-AI/oxen
brew install oxen
For other platforms follow the installation instructions.
🐍 Python Installation#
$ pip install oxenai
All the same APIs that are exposed through the command line are also available in python.
import oxen

repo = oxen.LocalRepo("path/to/repo")
repo.clone("https://hub.oxen.ai/ox/CatDogBBox")

repo.add("new-cat.png")
repo.commit("Adding a new cat")

repo.push()
🧑💻 OxenHub#
The shift to Software 2.0 is happening where we are replacing lines with machine learning models and large datasets. Software is already complex, without the complexity of machine learning in the mix. We need better tooling to keep track of changes as data and models evolve over time.
With the Hub, enable your team to discover, view, collaborate, and manage your datasets.
Visit https://www.oxen.ai/register to register for early access to the Hub where you can host your datasets.
Basic Commands#
Here is a quick overview of common Oxen commands. If you are familiar with git, this should be an easy learning curve.
Setup User#
For your commit history, you will have to set up your local Oxen user name and email. This is what will show up in oxen log or in the OxenHub dashboard for who changed what.
oxen config --name "YOUR_NAME" --email "YOUR_EMAIL"
Clone a Remote Repository#
There are a few ways that you can clone an Oxen repository, depending on the level of data transfer you want to incur. The default oxen clone with no flags will download the latest commit from the main branch.
oxen clone https://hub.oxen.ai/ox/CatDogBBox
To fetch the latest commit from a specific branch you can use the -b flag.
oxen clone https://hub.oxen.ai/ox/CatDogBBox -b my-pets
Downloading all the data may still be a more expensive operation than you need. You can download the minimal metadata to still interact with the remote by using the --shallow flag.
oxen clone https://hub.oxen.ai/ox/CatDogBBox --shallow -b my-pets
This is especially handy for appending data via the remote workspace. When downloading by using the --shallow flag you will notice no data files in your working directory. You can still see the data on the branch on the remote with the oxen remote subcommands.
# View the remote files
oxen remote ls
You can also download a subset by using oxen remote download to download subsets of directories or files. This is useful if you only need the testing data and not the full training data files and directories.
oxen remote download test.csv
Lastly, if you want to clone the entire commit history locally, you can use the --all flag. This is handy if you want to pull a full history and push to a new remote, or have a workflow where you need to quickly swap between commits locally. Often for running experiments, training, or testing, all you need is a subset of the data.
oxen clone https://hub.oxen.ai/ox/CatDogBBox --all
Initialize Local Repository#
If you do not have a remote dataset, you can initialize one locally.
Similar to git: create a new directory, navigate into it, and perform
oxen init
Stage Data#
You can stage changes that you are interested in committing with the oxen add command and giving a full file path or directory.
oxen add images/
View Status#
To see what data is tracked, staged, or not yet added to the repository you can use the status command.
Note: since we are dealing with large datasets with many files, status rolls up the changes and summarizes them for you.
oxen status
On branch main -> e76dd52a4fc13a6f

Directories to be committed
  added: images with added 8108 files

Files to be committed:
  new file: images/000000000042.jpg
  new file: images/000000000074.jpg
  new file: images/000000000109.jpg
  new file: images/000000000307.jpg
  new file: images/000000000309.jpg
  new file: images/000000000394.jpg
  new file: images/000000000400.jpg
  new file: images/000000000443.jpg
  new file: images/000000000490.jpg
  new file: images/000000000575.jpg
  ... and 8098 others

Untracked Directories
  (use "oxen add <dir>..." to update what will be committed)
  annotations/ (3 items)
You can always paginate through the changes with the -s (skip) and -l (limit) params on the status command. Run oxen status --help for more info.
Commit Changes#
To commit the changes that are staged with a message you can use
oxen commit -m "Some informative commit message"
Log#
You can see the history of changes on your current branch by running:
oxen log
commit 6b958e268656b0c5

Author: Ox
Date:   Fri, 21 Oct 2022 16:08:39 -0700

    adding 10,000 training images

commit e76dd52a4fc13a6f

Author: Ox
Date:   Fri, 21 Oct 2022 16:05:22 -0700

    Initialized Repo 🐂
Reverting To Commit#
If ever you want to change your working directory to a point in your commit history, you can simply supply the commit id from your history to the checkout command.
oxen checkout COMMIT_ID
Restore Working Directory#
The restore command comes in handy if you made some changes locally and you want to revert the changes. This can be used for example if you accidentally delete or modify or stage a file that you did not intend to.
oxen restore path/to/file.txt
Restore defaults to restoring the files to the current HEAD. For more detailed options, as well as how to unstage files refer to the restore documentation.
Removing Data#
To stage a file to be removed from the next commit, use the oxen rm command. Removing data from a commit can be useful if you find errors or simply want to create a smaller subset of data on a separate branch for debugging or testing.
oxen rm path/to/file.txt
Note: the file must be committed in the history for this to work. If you want to remove a file that has not been committed yet, simple use your /bin/rm command.
To recursively remove a directory use the -r flag.
oxen rm -r path/to/dir
If you accidentally staged a file that you do not want to commit, you can also use oxen rm with the --staged flag to unstage the file or directory.
oxen rm --staged -r path/to/dir
Once data has been committed, a version of it always lives in the .oxen/versions directory. As of right now there is no way to completely remove it from the repository history, this functionality is in our backlog for sensitive data that was accidentally committed.
Advanced Features#
Oxen has many more advanced features such as computing diffs between tabular data as well as convenient DataFrame manipulation through the oxen df command.
Feel free to skip down to the more advanced features.
Sharing Data and Collaboration#
There are two ways you can collaborate on your data with Oxen.
Register on Oxen
Self-hosting using the oxen-server binary
The easiest route is to sign up for an account on Oxen and sync your data to a repository there.
Create an account#
Visit https://www.oxen.ai/register to register
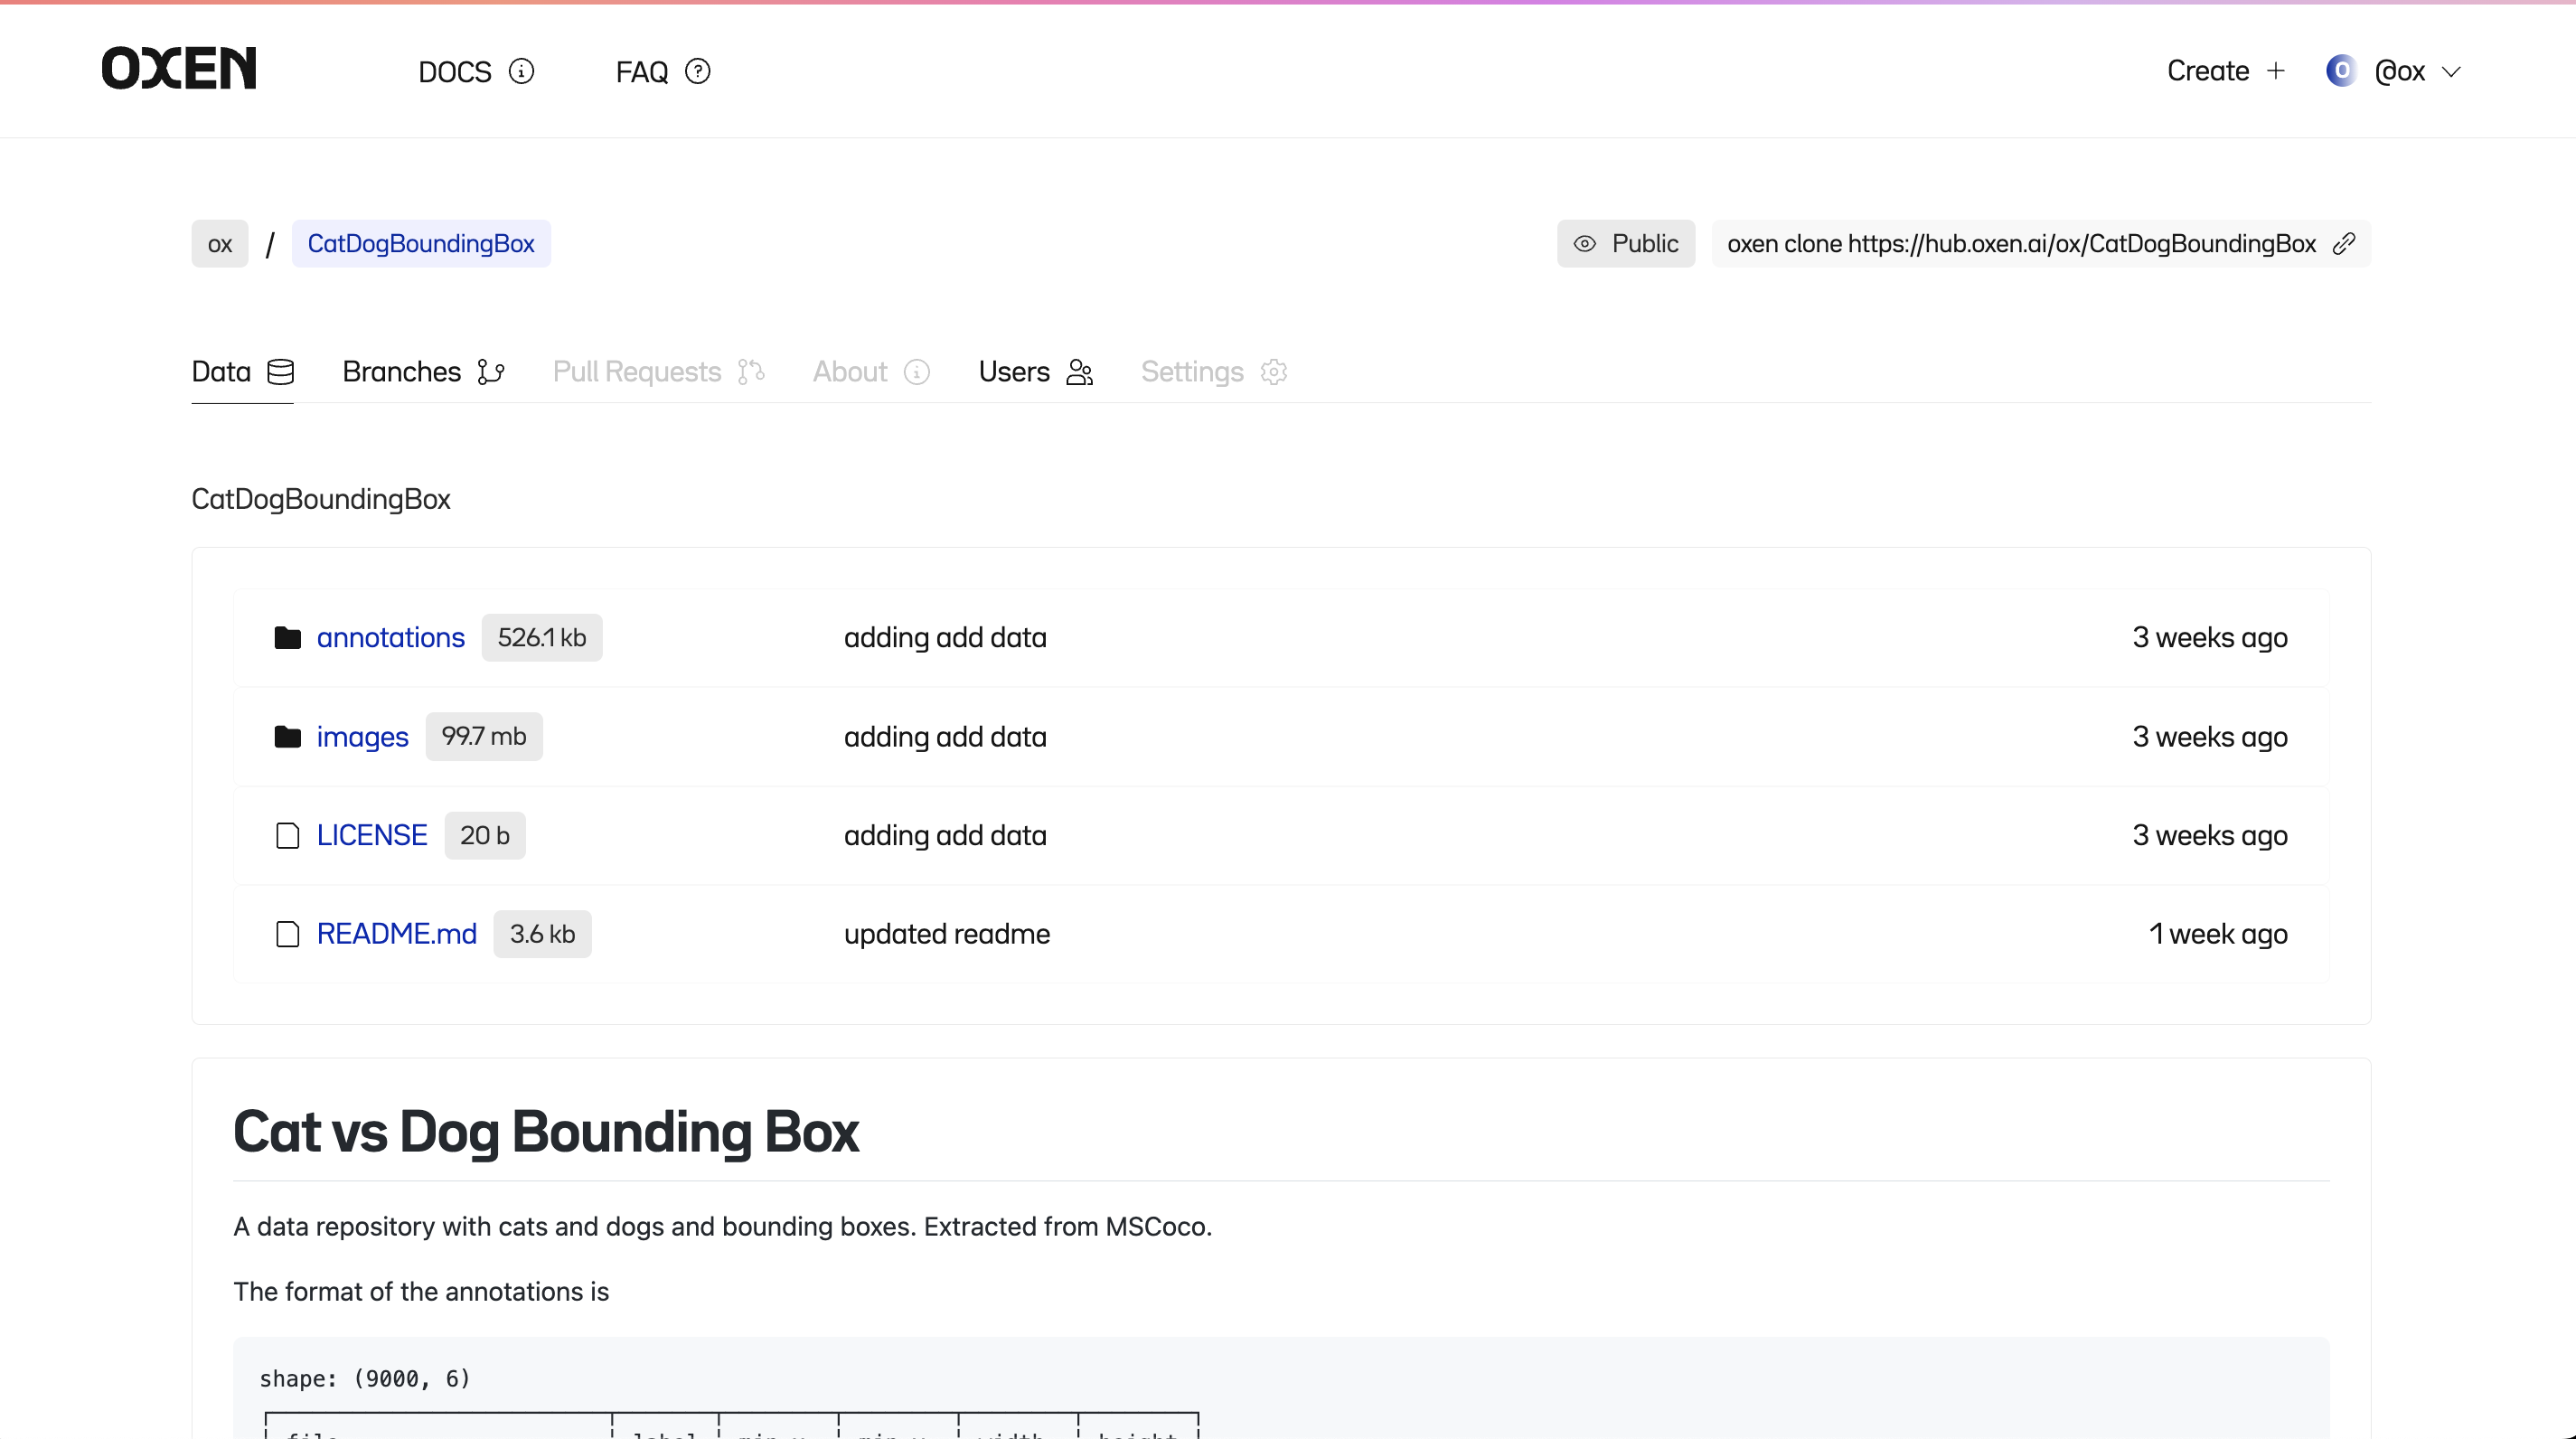
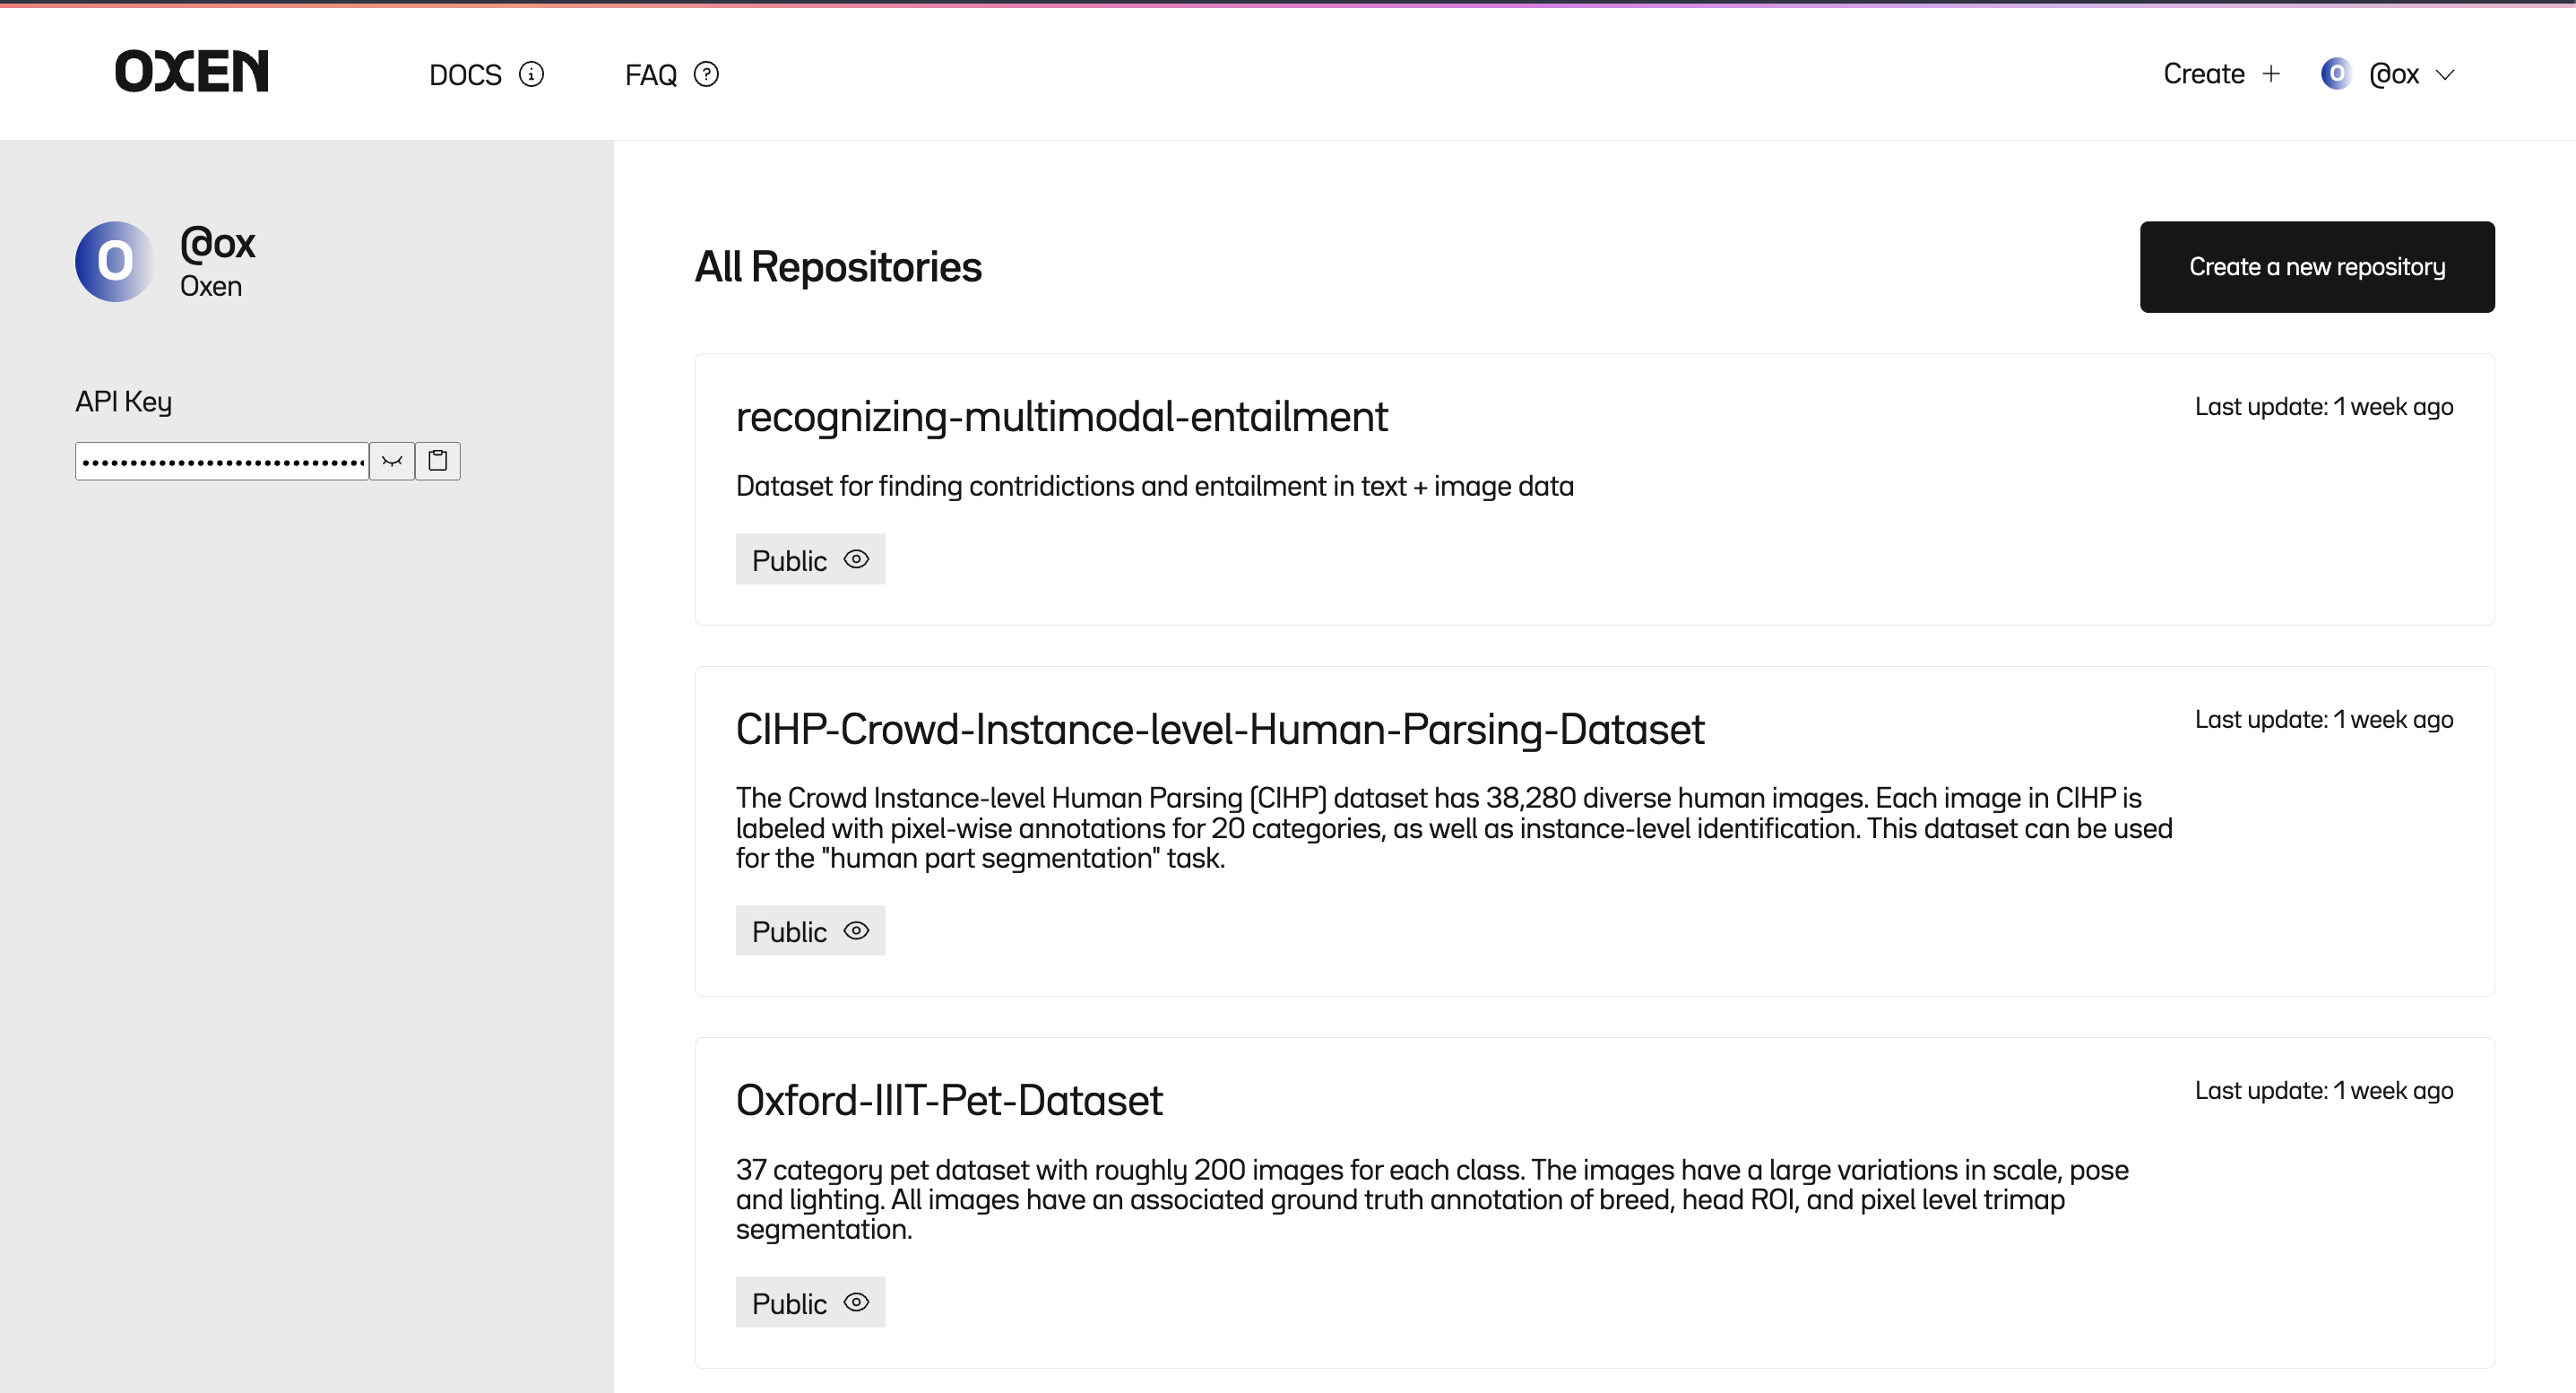
Your Repositories#
From your home page, you can view your repositories and create a new repository.
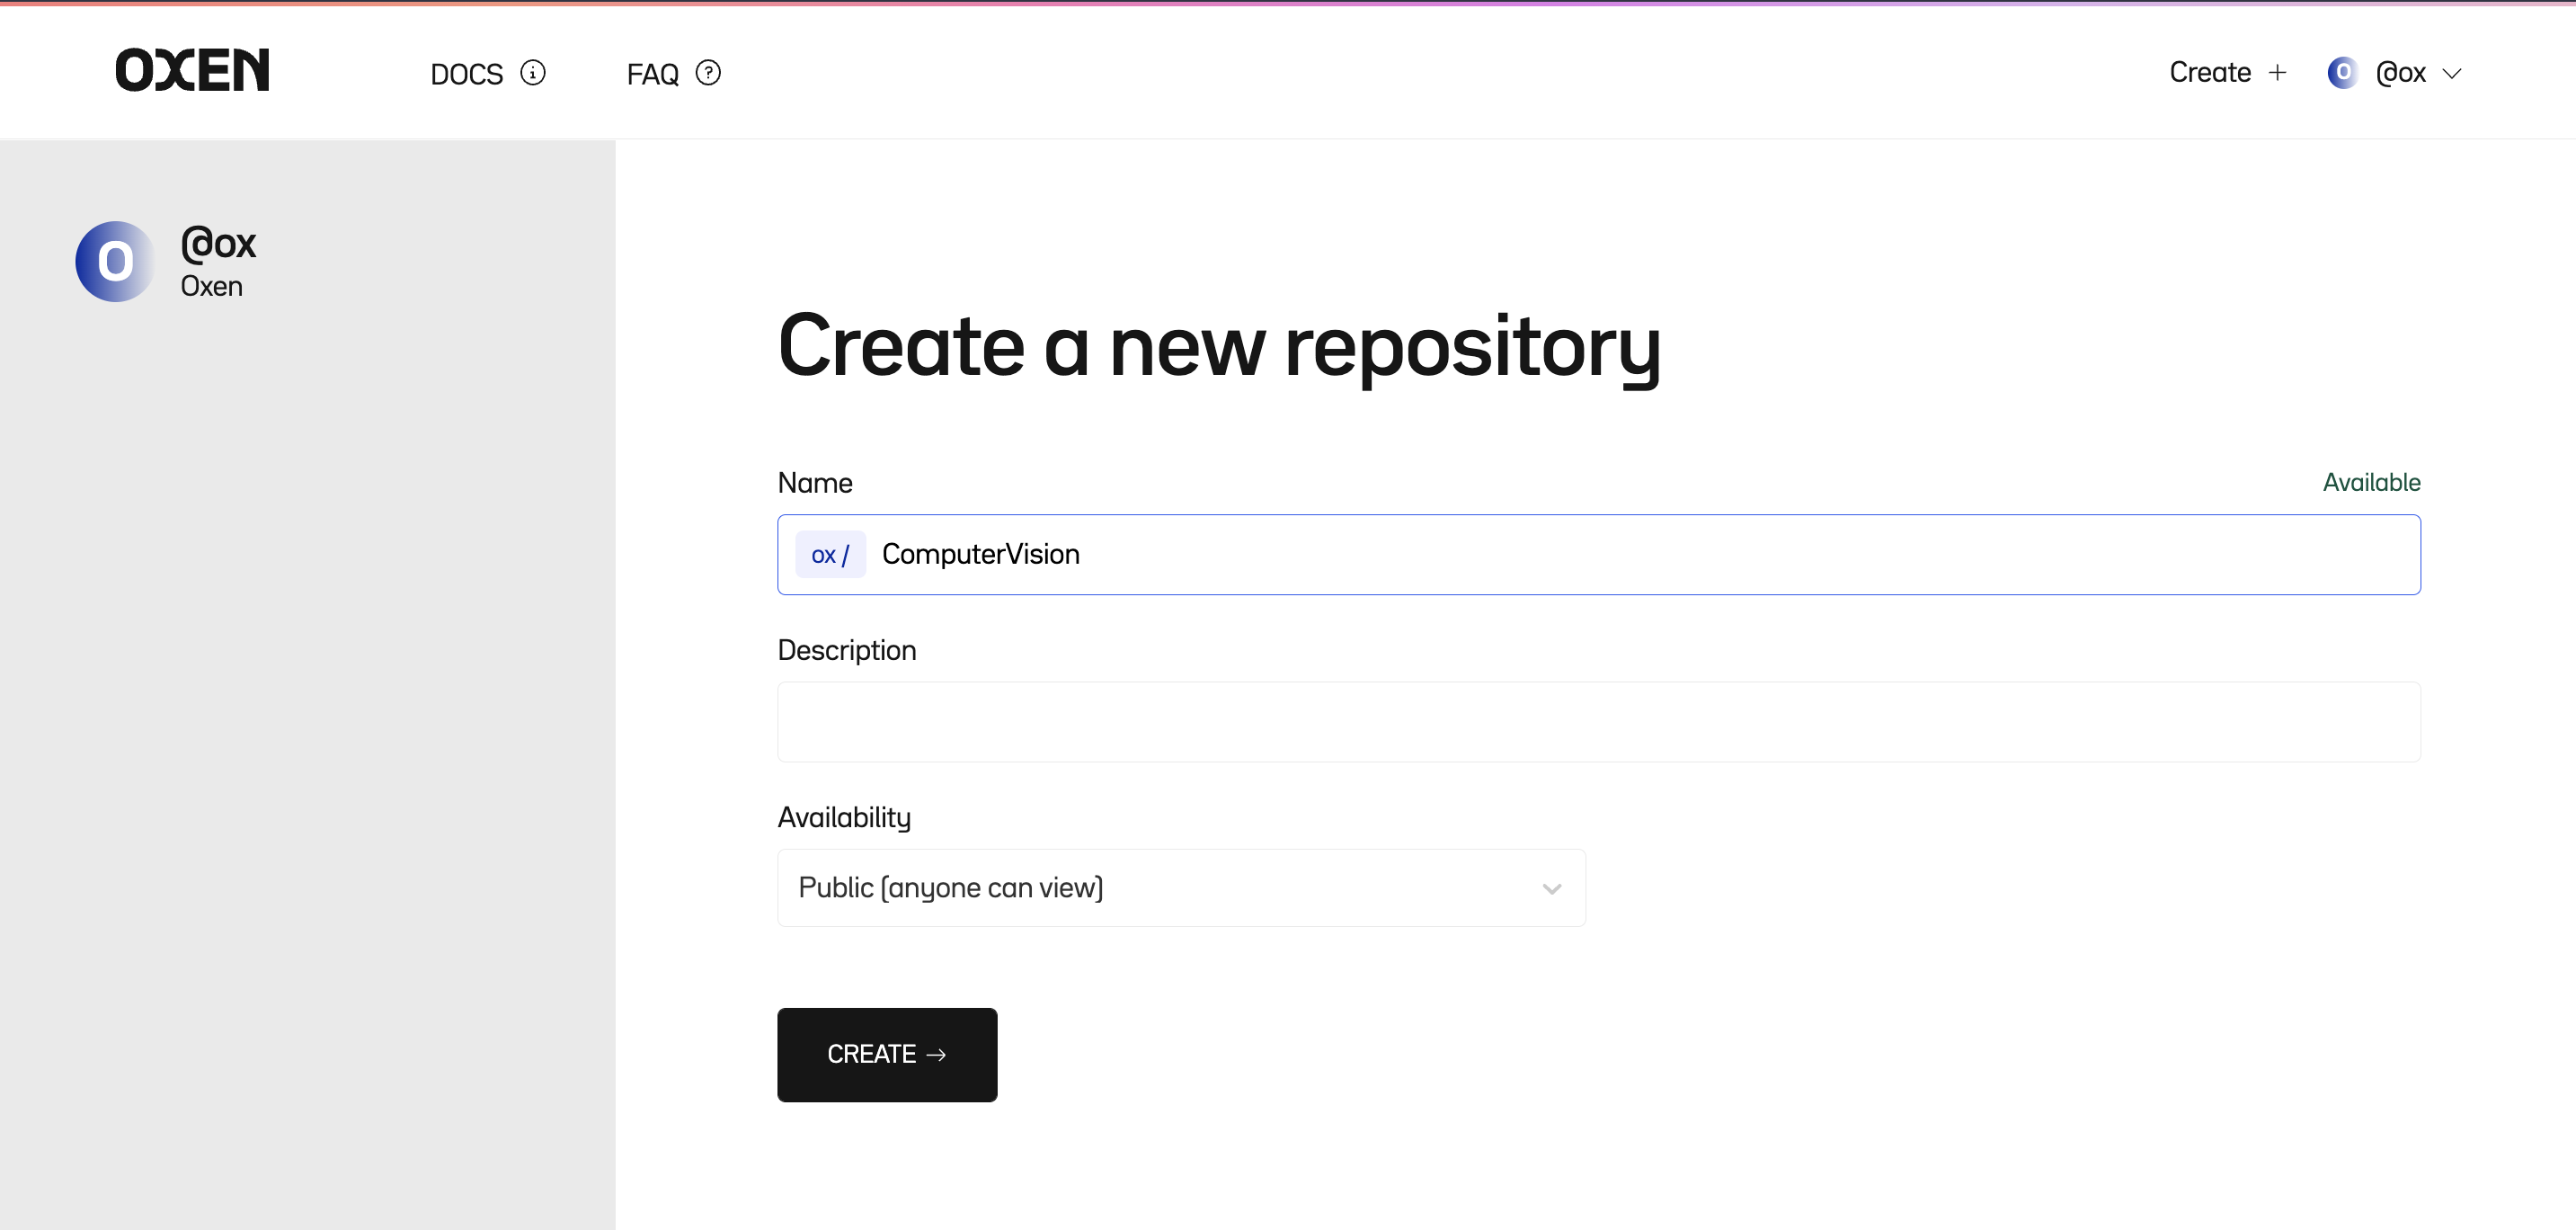
Create Remote Repository#
Pick a name and give your repository a description. Repositories can be public for anyone to view, or private just for you and your company.
Push your data#
Once you have created a repository, you will see a URL you can push your data to in the format https://hub.oxen.ai/<username>/<repo_name>
From the data repository that you created above you can simply add the remote and push.
oxen config --set-remote origin https://hub.oxen.ai/<username>/<repo_name>
oxen push origin main
🎉 Congrats! You should now be able to see your data in the hub.
Now you can set up your training job or another collaborator on your team to use your data by cloning it and pulling the branch you want.
There is a --shallow flag on oxen clone to make sure you don’t pull all the data on clone. The default is cloning main and all the associated data
oxen clone https://hub.oxen.ai/$USERNAME/$REPO_NAME --shallow
cd $REPO_NAME
oxen pull origin my-branch
Remote Workspace#
There are times when you do not want to clone the entire repository to make a change. For example, if you have a large dataset and you want to add one annotation, it is very inefficient to clone all the files locally.
You can think of Oxen’s remote workspace as mirroring your local workspace, but without all the files downloaded. It should feel like you are interacting locally when really all the action is on the server. Simply add the oxen remote subcommand to the commands you already know how to use locally.
Let’s walk through an example. Start by shallow cloning a repo and a checkout a specific branch.
oxen clone https://hub.oxen.ai/<username>/<repo_name> --shallow -b add-images
If you do a quick ls you will see that there are no files locally. Never fear, we are in a shallow state and can still interact with the repo remotely.
oxen remote status
This checks the remote workspace on this branch to see if you have any remote files staged. You can then proceed to add and commit changes without ever having to clone the entire dataset.
oxen remote add image.png
oxen remote status
For more information about Oxen’s remote workspaces, refer to the remote workspace documentation.
Oxen Badges#

You can add a badge to your README to show the status of your repository. Badges show a summary of the data in your repository. The badge is generated as a .svg so you can embed badges on other sites like GitHub if your code lives elsewhere.
Example Markdown:
[](https://oxen.ai/$USERNAME/$REPO_NAME)
Simply replace $USERNAME and $REPO_NAME above with your username and repository name.
Self Hosting#
Oxen enables self-hosting with the oxen-server binary. You do not get any of the UI features of the hub, but this is a nice option to kick the tires or set up internal infrastructure. Some teams set up a server instance in their local network and use it simply as backup and version control, others set it up in the cloud to enable sharing across data centers.
You can read more about self-hosting here.
Diving Deeper#
Data Frames#
Oxen is smart about what file types you are adding. For example, if you track a tabular data file (with an extension .csv, .tsv, .parquet, .arrow, .jsonl, or .ndjson) Oxen will index and keep track of each row of data.
oxen add annotations/train.csv
oxen commit -m "adding rows and rows of data"
Under the hood, Oxen will detect the data schema and hash every row of content. This allows us to build a content addressable DataFrame to track the changes to the rows and columns over time. To learn more about the power of indexing DataFrames check out the data point level version control documentation.
Oxen also has some handy command line tooling for Exploratory Data Analysis with DataFrames. The oxen df command lets you easily view, modify, slice, and modify the data.
oxen df annotations/train.csv
shape: (10000, 6)
┌─────────────────────────┬───────┬────────┬────────┬────────┬────────┐
│ file                    ┆ label ┆ min_x  ┆ min_y  ┆ width  ┆ height │
│ ---                     ┆ ---   ┆ ---    ┆ ---    ┆ ---    ┆ ---    │
│ str                     ┆ str   ┆ f64    ┆ f64    ┆ f64    ┆ f64    │
╞═════════════════════════╪═══════╪════════╪════════╪════════╪════════╡
│ images/000000128154.jpg ┆ cat   ┆ 0.0    ┆ 19.27  ┆ 130.79 ┆ 129.58 │
├╌╌╌╌╌╌╌╌╌╌╌╌╌╌╌╌╌╌╌╌╌╌╌╌╌┼╌╌╌╌╌╌╌┼╌╌╌╌╌╌╌╌┼╌╌╌╌╌╌╌╌┼╌╌╌╌╌╌╌╌┼╌╌╌╌╌╌╌╌┤
│ images/000000544590.jpg ┆ cat   ┆ 9.75   ┆ 13.49  ┆ 214.25 ┆ 188.35 │
├╌╌╌╌╌╌╌╌╌╌╌╌╌╌╌╌╌╌╌╌╌╌╌╌╌┼╌╌╌╌╌╌╌┼╌╌╌╌╌╌╌╌┼╌╌╌╌╌╌╌╌┼╌╌╌╌╌╌╌╌┼╌╌╌╌╌╌╌╌┤
│ images/000000000581.jpg ┆ dog   ┆ 49.37  ┆ 67.79  ┆ 74.29  ┆ 116.08 │
├╌╌╌╌╌╌╌╌╌╌╌╌╌╌╌╌╌╌╌╌╌╌╌╌╌┼╌╌╌╌╌╌╌┼╌╌╌╌╌╌╌╌┼╌╌╌╌╌╌╌╌┼╌╌╌╌╌╌╌╌┼╌╌╌╌╌╌╌╌┤
│ images/000000236841.jpg ┆ cat   ┆ 115.21 ┆ 96.65  ┆ 93.87  ┆ 42.29  │
├╌╌╌╌╌╌╌╌╌╌╌╌╌╌╌╌╌╌╌╌╌╌╌╌╌┼╌╌╌╌╌╌╌┼╌╌╌╌╌╌╌╌┼╌╌╌╌╌╌╌╌┼╌╌╌╌╌╌╌╌┼╌╌╌╌╌╌╌╌┤
│ ...                     ┆ ...   ┆ ...    ┆ ...    ┆ ...    ┆ ...    │
├╌╌╌╌╌╌╌╌╌╌╌╌╌╌╌╌╌╌╌╌╌╌╌╌╌┼╌╌╌╌╌╌╌┼╌╌╌╌╌╌╌╌┼╌╌╌╌╌╌╌╌┼╌╌╌╌╌╌╌╌┼╌╌╌╌╌╌╌╌┤
│ images/000000257301.jpg ┆ dog   ┆ 84.85  ┆ 161.09 ┆ 33.1   ┆ 51.26  │
├╌╌╌╌╌╌╌╌╌╌╌╌╌╌╌╌╌╌╌╌╌╌╌╌╌┼╌╌╌╌╌╌╌┼╌╌╌╌╌╌╌╌┼╌╌╌╌╌╌╌╌┼╌╌╌╌╌╌╌╌┼╌╌╌╌╌╌╌╌┤
│ images/000000130399.jpg ┆ dog   ┆ 51.63  ┆ 157.14 ┆ 53.13  ┆ 29.75  │
├╌╌╌╌╌╌╌╌╌╌╌╌╌╌╌╌╌╌╌╌╌╌╌╌╌┼╌╌╌╌╌╌╌┼╌╌╌╌╌╌╌╌┼╌╌╌╌╌╌╌╌┼╌╌╌╌╌╌╌╌┼╌╌╌╌╌╌╌╌┤
│ images/000000215471.jpg ┆ cat   ┆ 126.18 ┆ 71.95  ┆ 36.19  ┆ 47.81  │
├╌╌╌╌╌╌╌╌╌╌╌╌╌╌╌╌╌╌╌╌╌╌╌╌╌┼╌╌╌╌╌╌╌┼╌╌╌╌╌╌╌╌┼╌╌╌╌╌╌╌╌┼╌╌╌╌╌╌╌╌┼╌╌╌╌╌╌╌╌┤
│ images/000000251246.jpg ┆ cat   ┆ 58.23  ┆ 13.27  ┆ 90.79  ┆ 97.32  │
└─────────────────────────┴───────┴────────┴────────┴────────┴────────┘
To learn more about what you can do with tabular data in Oxen you can reference the documentation here
Integrating Labeling Tools#
For most supervised learning projects you will have some sort of annotation or labeling workflow. There are some popular open-source tools such as Label Studio for labeling data that can integrate with an Oxen workflow.
For an example of integrating Oxen into your Label Studio workflow, check out our Oxen Annotation Documentation.
Diff#
If you want to see the differences between your file and the conflicting file, you can use the oxen diff command.
Oxen knows how to compare text files as well as tabular data between commits. Currently, you must specify the specific path to the file you want to compare the changes.
If the file is tabular data oxen diff will show you the rows that were added or removed.
oxen df annotations/data.csv --add-row 'images/my_cat.jpg,cat,0,0,0,0' -o annotations/data.csv
oxen diff annotations/data.csv
Added Rows

╭───────────────────┬───────┬───────┬───────┬───────┬────────╮
│ file              ┆ label ┆ min_x ┆ min_y ┆ width ┆ height │
├╌╌╌╌╌╌╌╌╌╌╌╌╌╌╌╌╌╌╌┼╌╌╌╌╌╌╌┼╌╌╌╌╌╌╌┼╌╌╌╌╌╌╌┼╌╌╌╌╌╌╌┼╌╌╌╌╌╌╌╌┤
│ images/my_cat.jpg ┆ cat   ┆ 0     ┆ 0     ┆ 0     ┆ 0      │
╰───────────────────┴───────┴───────┴───────┴───────┴────────╯
 1 Rows x 6 Columns
If the tabular data schema has changed oxen diff will flag and show you the columns that were added.
oxen df annotations/data.csv --add-col 'is_fluffy:unknown:str' -o annotations/data.csv
oxen diff annotations/data.csv

Added Cols
shape: (10001, 1)
┌───────────┐
│ is_fluffy │
│ ---       │
│ str       │
╞═══════════╡
│ unknown   │
├╌╌╌╌╌╌╌╌╌╌╌┤
│ unknown   │
├╌╌╌╌╌╌╌╌╌╌╌┤
│ unknown   │
├╌╌╌╌╌╌╌╌╌╌╌┤
│ unknown   │
├╌╌╌╌╌╌╌╌╌╌╌┤
│ ...       │
├╌╌╌╌╌╌╌╌╌╌╌┤
│ unknown   │
├╌╌╌╌╌╌╌╌╌╌╌┤
│ unknown   │
├╌╌╌╌╌╌╌╌╌╌╌┤
│ unknown   │
├╌╌╌╌╌╌╌╌╌╌╌┤
│ unknown   │
└───────────┘


Schema has changed

Old
+------+-------+-------+-------+-------+--------+
| file | label | min_x | min_y | width | height |
| ---  | ---   | ---   | ---   | ---   | ---    |
| str  | str   | f64   | f64   | f64   | f64    |
+------+-------+-------+-------+-------+--------+

Current
+------+-------+-------+-------+-------+--------+-----------+
| file | label | min_x | min_y | width | height | is_fluffy |
| ---  | ---   | ---   | ---   | ---   | ---    | ---       |
| str  | str   | f64   | f64   | f64   | f64    | str       |
+------+-------+-------+-------+-------+--------+-----------+
If the file is any other type of text data, it will simply show you the added and removed lines.
oxen diff path/to/file.txt
 i
+here
 am a text file that
+I am modifying
-la-dee-da
+la-doo-da
+another line
Branching#
Branches are used to augment the dataset and run experiments with different subsets, transformations, or extensions of the data. The main branch is the default branch when you start an Oxen repository. Use different branches while you run your experiments, and when you are confident in a dataset, merge it back into the main branch.
You can create a new branch with
oxen checkout -b branch_name
Switch back to main
oxen checkout main
and delete the branch again
oxen branch -d branch_name
If you want to make the branch available to others, make sure to push it to a remote
oxen push origin branch_name
To see all the available branches you have locally run
oxen branch -a
Pulling New Changes#
To update your local repository to the latest changes, run
oxen pull origin branch_name
Again you can specify the remote and the branch name you would like to pull
Merging the changes#
If you feel confident in your changes, you can check out the main branch again, then merge your changes in.
oxen checkout main
oxen merge branch_name
If there are conflicts, Oxen will flag them and you will need to add and commit the files again in a separate commit. Oxen currently does not add any modifications to your working file, just flags it as conflicting. If you simply want to take your version, just add and commit again.
oxen add file/with/conflict.jpg
oxen commit -m "fixing conflict"
Dealing With Merge Conflicts#
Oxen currently has three ways to deal with merge conflicts.
Take the other person’s changes
oxen checkout file/with/conflict.jpg --theirs, then add and commit.Take the changes in your current working directory (simply have to add and commit again)
Combine tabular data
oxen checkout file/with/conflict.csv --combine
If you use the --combine flag, oxen will concatenate the data frames and unique them based on the row values.
Content Hashing and Core Metadata Extraction#
Oxen uses some core metadata around the file to be able to version and transfer the data efficiently. Any time a file gets versioned, it’s hash is computed and the contents is put into a content addressable filesystem. These files can be found in the hidden .oxen directory. For example a file with the hash 7f65e0e4bda0acc99c56ecacbe092141 will be stored in .oxen/versions/files/7f/65e0e4bda0acc99c56ecacbe092141/ for fast random access given the hash.
To find out more info about a file with the CLI you can use the oxen info command. For example:
$ oxen info images/test.jpg
fa42a17de86fa628b7caa8df6ba4d774    83851   image   image/jpeg  jpg
If you want to know the column names of each field, used the -v flag. All fields are separated by a tab so it is easy to pipe into cut or other unix style commands.
$ oxen info images/test.jpg -v
hash    size    data_type   mime_type   extension
fa42a17de86fa628b7caa8df6ba4d774    83851   image   image/jpeg  jpg
Support#
If you have any questions, comments, suggestions, or just want to get in contact with the team, feel free to email us at hello@oxen.ai
Contributing#
This repository contains the documentation and release builds. To contribute to the core code base visit Oxen-AI/Oxen